|
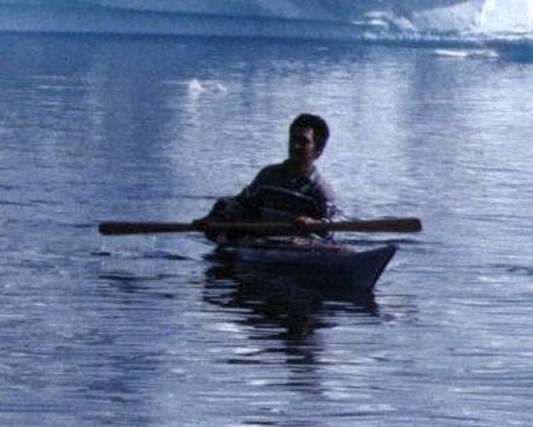
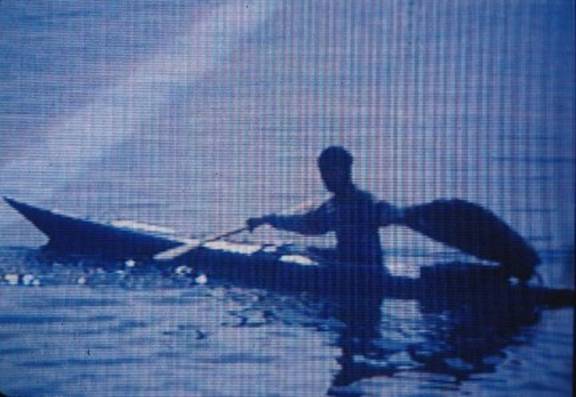
Kullorsuaq Kayak paddling Lars Jensen 1995 Interesting details about kayaking for
hunting Gail Ferris www.nkhorizons.com/KullorsuaqLarsJensenKayak.htm |
||||||||||||||||||||||||||||||||||||||||||||||||||||||||||||||||||||||||||||||||||||||||||||||||||||||||||||||||||||||||||||||||||||||||||||||||||||||||||||||||||||||||||||||||||||||||||||||||||||||||||||||||||||||||||||||||||||||||||||||||||||||||||||||||||||||||||||||||||||||||||||||||
|
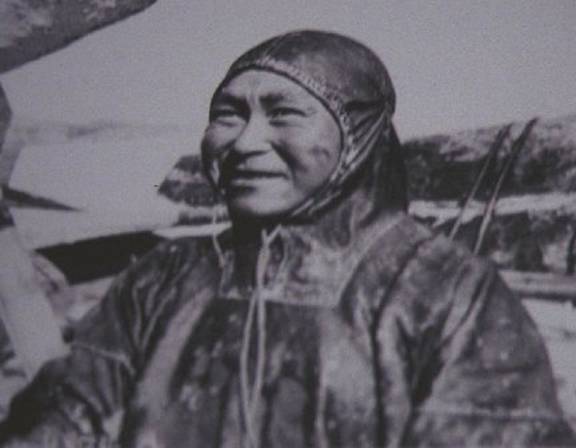
000 Kullorsuaq Nikolaj Jensen, Jetta Bang portrait In Kullorsuaq
Greenland on I
communicated my interest in kayak design to Nikolaj by sitting on the floor
demonstrating kayak paddling and showing him some of the measurements that I
was interested in obtaining. Nikolaj shared with me several
extremely important aspects of kayak and paddle design. |
||||||||||||||||||||||||||||||||||||||||||||||||||||||||||||||||||||||||||||||||||||||||||||||||||||||||||||||||||||||||||||||||||||||||||||||||||||||||||||||||||||||||||||||||||||||||||||||||||||||||||||||||||||||||||||||||||||||||||||||||||||||||||||||||||||||||||||||||||||||||||||||||
|
Neils
Møller of Upernavik said that the paddler is
measured with the feet pressed back and the legs straight out. Lars
Jensen, Nikolaj’s son, said that the distance is
measured with the feet straight up and the legs straight out. The kayak paddler sits with his
feet splayed in a V to the sides rather than straight up. This is one of the physical discomforts
that a Greenlander must adapt to for kayak paddling. In Kullorsuaq the Narwhal whale
is hunted by kayak because the silence of the kayak allows the hunter to
approach more closely. The paddle is
designed to be as quiet as possible by having the surface finely sanded or
scrapped as smooth as possible with a piece of glass so that the paddle does
not create any noise by dripping water.
Website
which shows the measurements of these paddles is located at http://www.guillemot-kayaks.com/Building/GailPaddles/GreenlandPaddles.html
|
||||||||||||||||||||||||||||||||||||||||||||||||||||||||||||||||||||||||||||||||||||||||||||||||||||||||||||||||||||||||||||||||||||||||||||||||||||||||||||||||||||||||||||||||||||||||||||||||||||||||||||||||||||||||||||||||||||||||||||||||||||||||||||||||||||||||||||||||||||||||||||||||
|
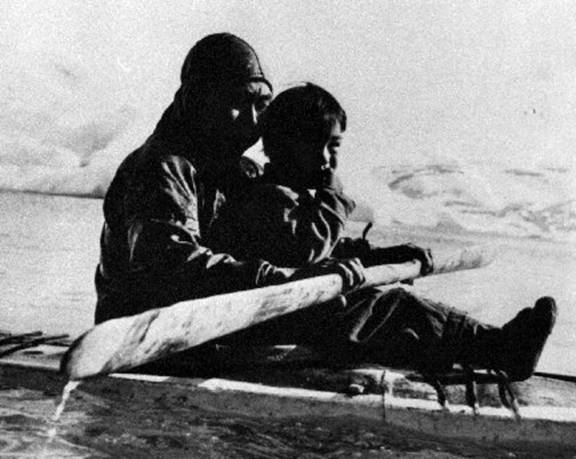
01 Nikolaj Jensen with his oldest son, Hans,
in his kayak note the paddle Jette Bang photo The
circumference of the loom is not measured with the thumb and index fingers
meeting, instead the loom is measured by the thumb and index finger including
an opening of about 2 cm to allow the thickness loom to have sufficient
strength. He mentioned that it is very
important for the cross section of the paddle is a diamond or rhombus, which
means that the paddle has a rib. He
greatly prefers to make his paddles thicker than many of the other paddles I
have seen in this area so that the paddle is strong. Therefore the paddle should
have a rib down the middle of the blade so that the paddle will not flutter
in the water, especially during the initial moments of hard paddling to
accelerate the kayak. He makes the
loom rectangular but does not make it thicker on the flat blade side he makes
it thicker on the cross section side this is the opposite of all the paddles
I have seen elsewhere in The loom is carved
where the blade starts with a 45° angle as a step up. I carefully measured one paddle used by Nathanial
Jensen, which had a distinct rib and another paddle used by Lars Jensen,
which happened not to have such a distinct rib. |
||||||||||||||||||||||||||||||||||||||||||||||||||||||||||||||||||||||||||||||||||||||||||||||||||||||||||||||||||||||||||||||||||||||||||||||||||||||||||||||||||||||||||||||||||||||||||||||||||||||||||||||||||||||||||||||||||||||||||||||||||||||||||||||||||||||||||||||||||||||||||||||||
|
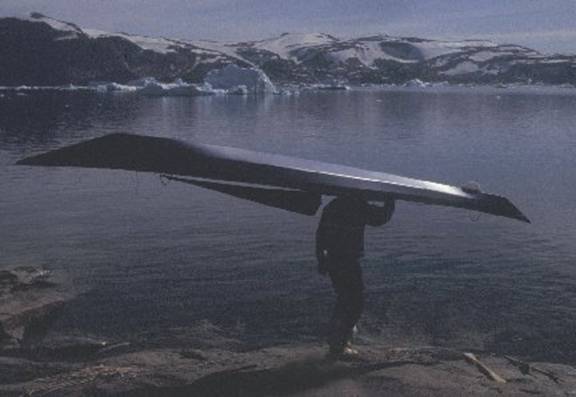
02 Kullorsuaq Lars Jensen carrying kayak to
water |
||||||||||||||||||||||||||||||||||||||||||||||||||||||||||||||||||||||||||||||||||||||||||||||||||||||||||||||||||||||||||||||||||||||||||||||||||||||||||||||||||||||||||||||||||||||||||||||||||||||||||||||||||||||||||||||||||||||||||||||||||||||||||||||||||||||||||||||||||||||||||||||||
|
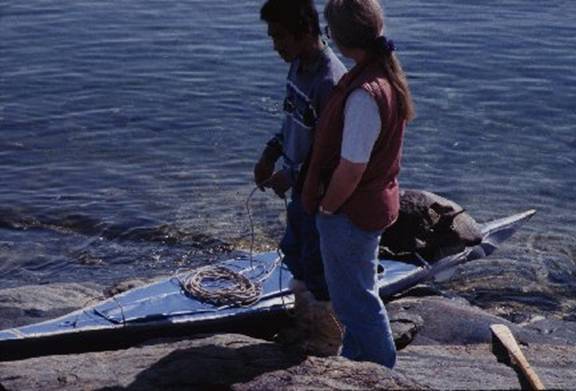
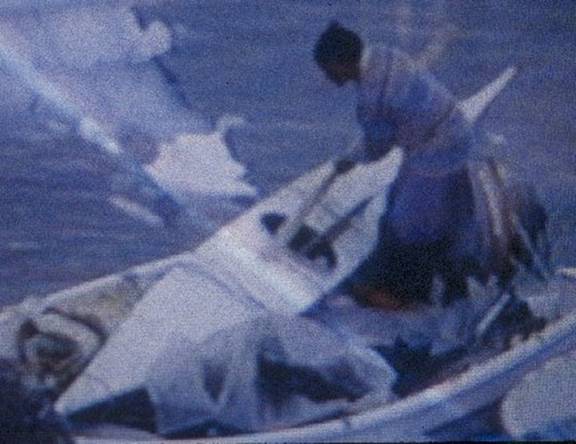
03 Kullorsuaq Lars Jensen with my translator
Lone Christiansen preparing harpoon line on his kayak |
||||||||||||||||||||||||||||||||||||||||||||||||||||||||||||||||||||||||||||||||||||||||||||||||||||||||||||||||||||||||||||||||||||||||||||||||||||||||||||||||||||||||||||||||||||||||||||||||||||||||||||||||||||||||||||||||||||||||||||||||||||||||||||||||||||||||||||||||||||||||||||||||
|
04 Kullorsuaq Jensen white kayak side view
note chines Nikolaj showed me that he measures the length for
the foot to the back by bending the feet back as far as comfortable with the
heels together with the legs straight out and the feet splayed in a V to the
sides rather than straight up. |
||||||||||||||||||||||||||||||||||||||||||||||||||||||||||||||||||||||||||||||||||||||||||||||||||||||||||||||||||||||||||||||||||||||||||||||||||||||||||||||||||||||||||||||||||||||||||||||||||||||||||||||||||||||||||||||||||||||||||||||||||||||||||||||||||||||||||||||||||||||||||||||||
|
Kullorsuaq Lars Jensen balancing in his kayak The
height of the cockpit above the knees is planned so that the knees will be
bent slightly upward to firmly touch the knee support cross beam, seeqqortarfik ajaaq, with the
feet to be extended forward pressing against the foot support cross beam, tukerumiaq ajaak during rough
water conditions and the knees must be well braced to execute the roll. This does not take
into account the distance between the kayaker's buttocks and the back support
cross beam, isserfik ajaaq
which I am not sure about. Probably
the kayak paddler is sitting firmly against this crossbeam to maintain
sufficient leverage. |
||||||||||||||||||||||||||||||||||||||||||||||||||||||||||||||||||||||||||||||||||||||||||||||||||||||||||||||||||||||||||||||||||||||||||||||||||||||||||||||||||||||||||||||||||||||||||||||||||||||||||||||||||||||||||||||||||||||||||||||||||||||||||||||||||||||||||||||||||||||||||||||||
|
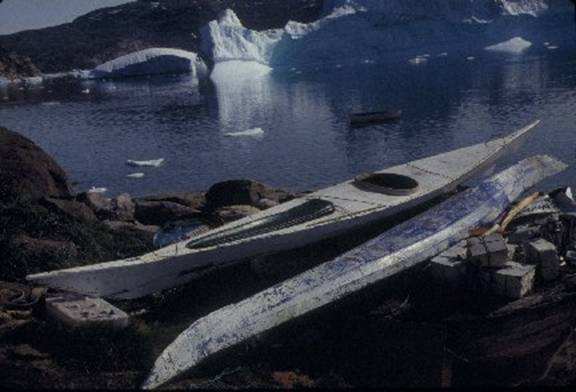
05 Kullorsuaq 1963 Christiansen kayak frame
used in 1963 |
||||||||||||||||||||||||||||||||||||||||||||||||||||||||||||||||||||||||||||||||||||||||||||||||||||||||||||||||||||||||||||||||||||||||||||||||||||||||||||||||||||||||||||||||||||||||||||||||||||||||||||||||||||||||||||||||||||||||||||||||||||||||||||||||||||||||||||||||||||||||||||||||
|
06 Kullorsuaq Lars & Nathanial Jensen
kayaks Nathanial's kayak had the chins set so that it is a flatter broader
kayak than Lars kayak. Nikolaj told me
as is to be expected that every kayak he builds is different because it is
planned according to the paddler’s body dimensions. |
||||||||||||||||||||||||||||||||||||||||||||||||||||||||||||||||||||||||||||||||||||||||||||||||||||||||||||||||||||||||||||||||||||||||||||||||||||||||||||||||||||||||||||||||||||||||||||||||||||||||||||||||||||||||||||||||||||||||||||||||||||||||||||||||||||||||||||||||||||||||||||||||
|
07 Kullorsuaq other Jensen kayaks showing
deck and hull with rifle scabbard that are below kayaks on the rack above |
||||||||||||||||||||||||||||||||||||||||||||||||||||||||||||||||||||||||||||||||||||||||||||||||||||||||||||||||||||||||||||||||||||||||||||||||||||||||||||||||||||||||||||||||||||||||||||||||||||||||||||||||||||||||||||||||||||||||||||||||||||||||||||||||||||||||||||||||||||||||||||||||
|
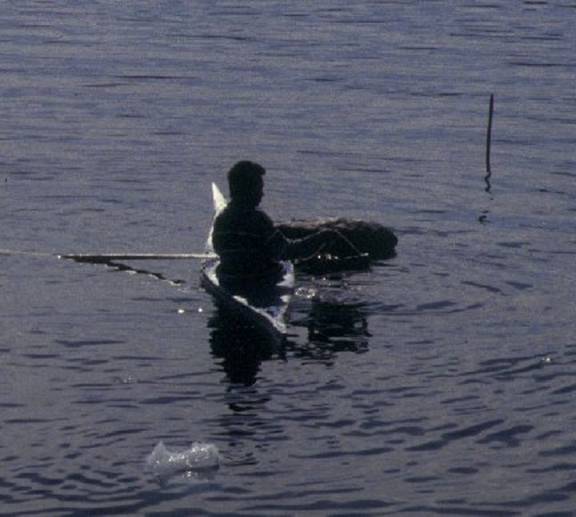
08 Kullorsuaq hunter preparing to hunt narwhal
with his kayak the paddler takes his kayak in a motorboat to the area the
whales are then he uses his kayak to stalk the whales and harpoon them Kullorsuaq
and Tasiussaq are where the Greenland kayak is used only for hunting the
Narwhal, because it is on the very edge of Melville Bay Narwhal come to this
region. |
||||||||||||||||||||||||||||||||||||||||||||||||||||||||||||||||||||||||||||||||||||||||||||||||||||||||||||||||||||||||||||||||||||||||||||||||||||||||||||||||||||||||||||||||||||||||||||||||||||||||||||||||||||||||||||||||||||||||||||||||||||||||||||||||||||||||||||||||||||||||||||||||
|
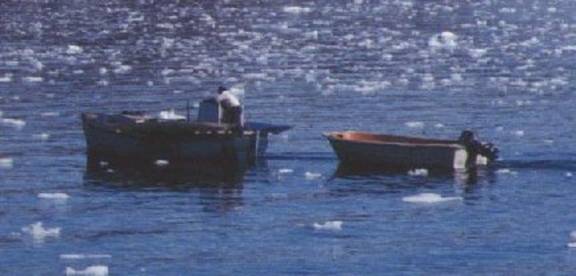
09 Kullorsuaq summer motor boat w kayak
towing motor boat |
||||||||||||||||||||||||||||||||||||||||||||||||||||||||||||||||||||||||||||||||||||||||||||||||||||||||||||||||||||||||||||||||||||||||||||||||||||||||||||||||||||||||||||||||||||||||||||||||||||||||||||||||||||||||||||||||||||||||||||||||||||||||||||||||||||||||||||||||||||||||||||||||
|
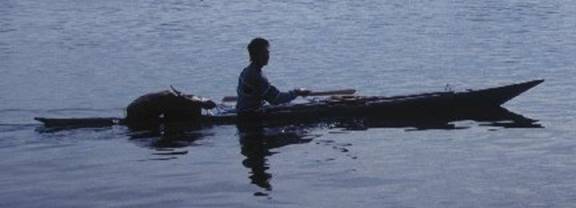
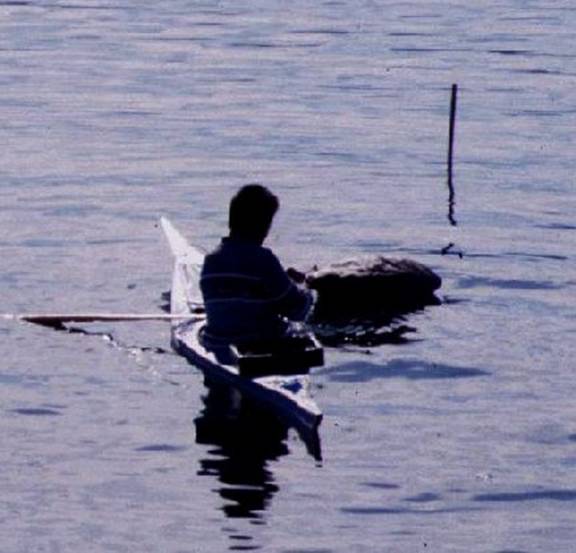
10 Kullorsuaq Lars Jensen swinging his kayak
around Regarding paddle design, the length of the
loom is slightly greater than the width of the kayak. The loom length is the width of the kayak
and the knuckles of the closed hand. The paddler has
enough room to paddle with a stroke that extends the paddler's arm of the
opposite side ending the hand at the waist of the paddler. Nikolaj said that this stroke is only used
on calm water and I immediately agreed that when the water is rough a much
shorter stroke is best. The paddle length
is determined by the combination of the length of the loom and the blade the
loom at the left side the blade out to the right side ending with the arm
extended out on a 30 angle the hand out
flat. I'm not sure at all about this
and to try to better understand this I had Lars measured. |
||||||||||||||||||||||||||||||||||||||||||||||||||||||||||||||||||||||||||||||||||||||||||||||||||||||||||||||||||||||||||||||||||||||||||||||||||||||||||||||||||||||||||||||||||||||||||||||||||||||||||||||||||||||||||||||||||||||||||||||||||||||||||||||||||||||||||||||||||||||||||||||||
|
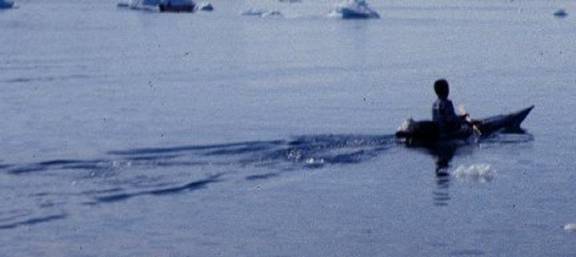
11 Kullorsuaq Lars Jensen accelerating kayak note
the submersion of the stern and the rise in the bow |
||||||||||||||||||||||||||||||||||||||||||||||||||||||||||||||||||||||||||||||||||||||||||||||||||||||||||||||||||||||||||||||||||||||||||||||||||||||||||||||||||||||||||||||||||||||||||||||||||||||||||||||||||||||||||||||||||||||||||||||||||||||||||||||||||||||||||||||||||||||||||||||||
|
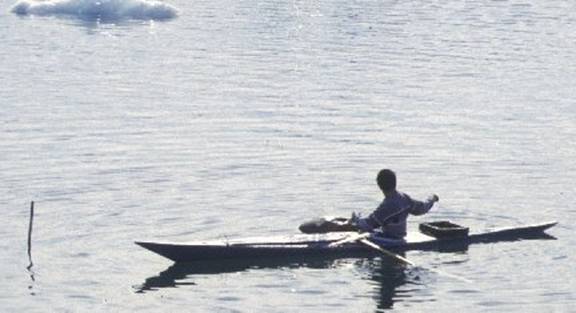
12 Kullorsuaq Lars Jensen hunting kayak gliding |
||||||||||||||||||||||||||||||||||||||||||||||||||||||||||||||||||||||||||||||||||||||||||||||||||||||||||||||||||||||||||||||||||||||||||||||||||||||||||||||||||||||||||||||||||||||||||||||||||||||||||||||||||||||||||||||||||||||||||||||||||||||||||||||||||||||||||||||||||||||||||||||||
|
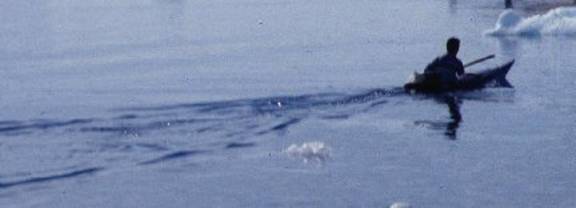
13 Kullorsuaq Lars Jensen kayak stern is just
about under at full speed |
||||||||||||||||||||||||||||||||||||||||||||||||||||||||||||||||||||||||||||||||||||||||||||||||||||||||||||||||||||||||||||||||||||||||||||||||||||||||||||||||||||||||||||||||||||||||||||||||||||||||||||||||||||||||||||||||||||||||||||||||||||||||||||||||||||||||||||||||||||||||||||||||
|
14 Kullorsuaq Lars Jensen full speed in kayak |
||||||||||||||||||||||||||||||||||||||||||||||||||||||||||||||||||||||||||||||||||||||||||||||||||||||||||||||||||||||||||||||||||||||||||||||||||||||||||||||||||||||||||||||||||||||||||||||||||||||||||||||||||||||||||||||||||||||||||||||||||||||||||||||||||||||||||||||||||||||||||||||||
|
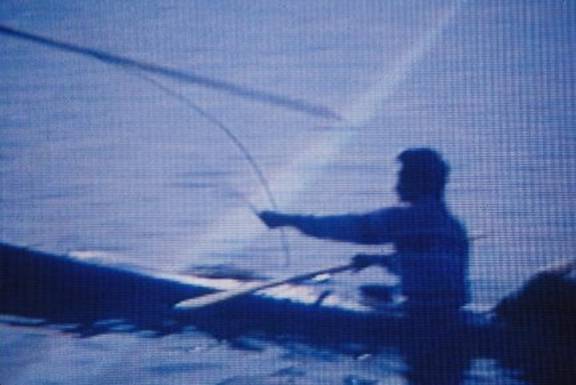
15 Kullorsuaq Lars Jensen throwing harpoon |
||||||||||||||||||||||||||||||||||||||||||||||||||||||||||||||||||||||||||||||||||||||||||||||||||||||||||||||||||||||||||||||||||||||||||||||||||||||||||||||||||||||||||||||||||||||||||||||||||||||||||||||||||||||||||||||||||||||||||||||||||||||||||||||||||||||||||||||||||||||||||||||||
|
16 Kullorsuaq Lars Jensen throwing harpoon in
water |
||||||||||||||||||||||||||||||||||||||||||||||||||||||||||||||||||||||||||||||||||||||||||||||||||||||||||||||||||||||||||||||||||||||||||||||||||||||||||||||||||||||||||||||||||||||||||||||||||||||||||||||||||||||||||||||||||||||||||||||||||||||||||||||||||||||||||||||||||||||||||||||||
|
17 Kullorsuaq Lars Jensen throwing avatak |
||||||||||||||||||||||||||||||||||||||||||||||||||||||||||||||||||||||||||||||||||||||||||||||||||||||||||||||||||||||||||||||||||||||||||||||||||||||||||||||||||||||||||||||||||||||||||||||||||||||||||||||||||||||||||||||||||||||||||||||||||||||||||||||||||||||||||||||||||||||||||||||||
|
18 Kullorsuaq Lars Jensen deploying avataq after
harpoon throw This avataq is a unique design of Nikolaj
Jensen, Lars father. The avataq that is made of a seal skin is
first deployed then the drogue which is made of wood square shaped with skin
stretched across it. |
||||||||||||||||||||||||||||||||||||||||||||||||||||||||||||||||||||||||||||||||||||||||||||||||||||||||||||||||||||||||||||||||||||||||||||||||||||||||||||||||||||||||||||||||||||||||||||||||||||||||||||||||||||||||||||||||||||||||||||||||||||||||||||||||||||||||||||||||||||||||||||||||
|
19 Kullorsuaq Lars Jensen adjusting avatak
float |
||||||||||||||||||||||||||||||||||||||||||||||||||||||||||||||||||||||||||||||||||||||||||||||||||||||||||||||||||||||||||||||||||||||||||||||||||||||||||||||||||||||||||||||||||||||||||||||||||||||||||||||||||||||||||||||||||||||||||||||||||||||||||||||||||||||||||||||||||||||||||||||||
|
20 Kullorsuaq Lars Jensen preparing to deploy
the drogue |
||||||||||||||||||||||||||||||||||||||||||||||||||||||||||||||||||||||||||||||||||||||||||||||||||||||||||||||||||||||||||||||||||||||||||||||||||||||||||||||||||||||||||||||||||||||||||||||||||||||||||||||||||||||||||||||||||||||||||||||||||||||||||||||||||||||||||||||||||||||||||||||||
|
|
||||||||||||||||||||||||||||||||||||||||||||||||||||||||||||||||||||||||||||||||||||||||||||||||||||||||||||||||||||||||||||||||||||||||||||||||||||||||||||||||||||||||||||||||||||||||||||||||||||||||||||||||||||||||||||||||||||||||||||||||||||||||||||||||||||||||||||||||||||||||||||||||
|
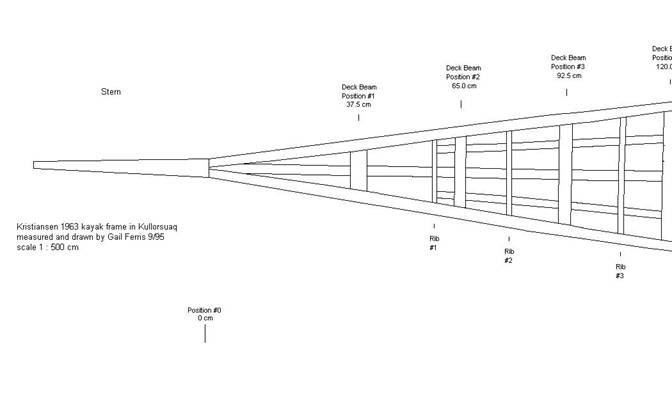
05 Kullorsuaq 1963 Christiansen kayak frame
used in 1963 |
||||||||||||||||||||||||||||||||||||||||||||||||||||||||||||||||||||||||||||||||||||||||||||||||||||||||||||||||||||||||||||||||||||||||||||||||||||||||||||||||||||||||||||||||||||||||||||||||||||||||||||||||||||||||||||||||||||||||||||||||||||||||||||||||||||||||||||||||||||||||||||||||
|
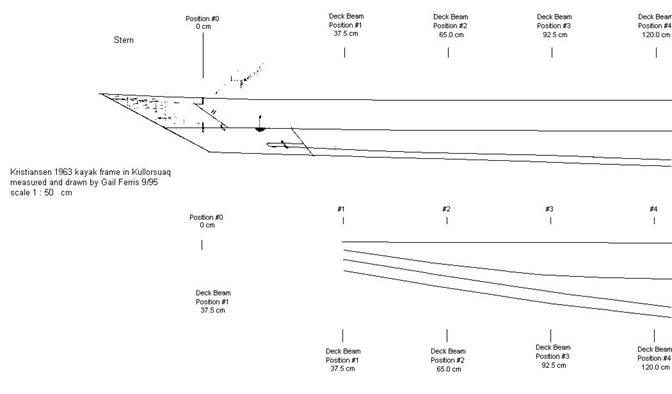
stern deck view positions #0/1/2/3/4 |
||||||||||||||||||||||||||||||||||||||||||||||||||||||||||||||||||||||||||||||||||||||||||||||||||||||||||||||||||||||||||||||||||||||||||||||||||||||||||||||||||||||||||||||||||||||||||||||||||||||||||||||||||||||||||||||||||||||||||||||||||||||||||||||||||||||||||||||||||||||||||||||||
|
stern side view position #0/1/2/3/4 |
||||||||||||||||||||||||||||||||||||||||||||||||||||||||||||||||||||||||||||||||||||||||||||||||||||||||||||||||||||||||||||||||||||||||||||||||||||||||||||||||||||||||||||||||||||||||||||||||||||||||||||||||||||||||||||||||||||||||||||||||||||||||||||||||||||||||||||||||||||||||||||||||
|
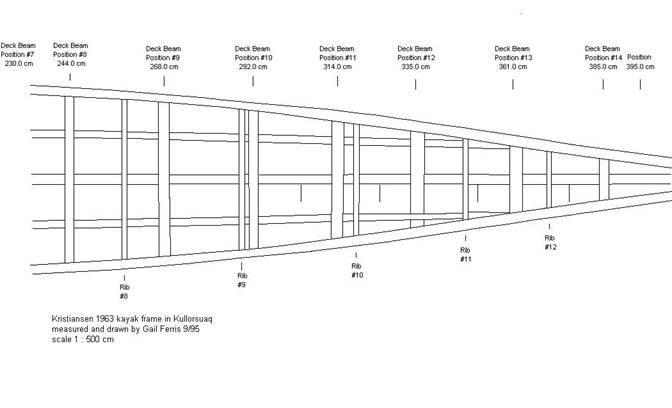
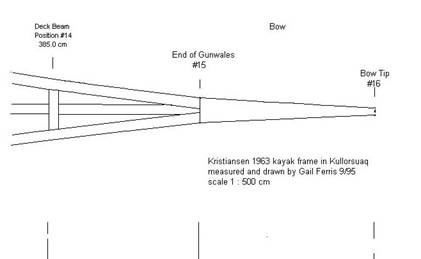
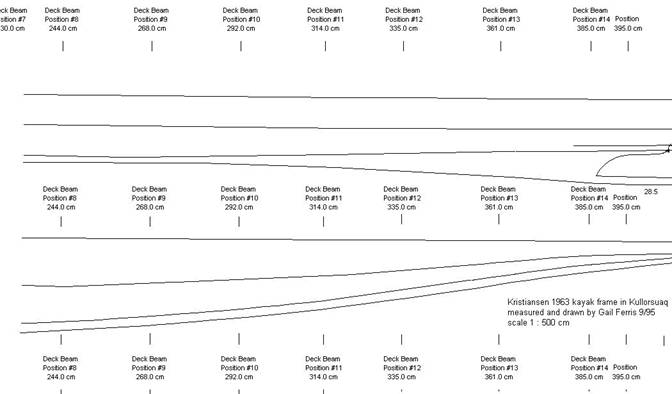
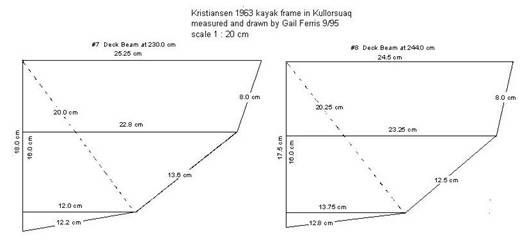
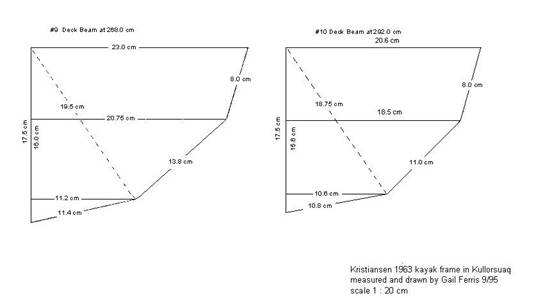
bow deck view beam position
#7/8/9/10/11/12/13/14 |
||||||||||||||||||||||||||||||||||||||||||||||||||||||||||||||||||||||||||||||||||||||||||||||||||||||||||||||||||||||||||||||||||||||||||||||||||||||||||||||||||||||||||||||||||||||||||||||||||||||||||||||||||||||||||||||||||||||||||||||||||||||||||||||||||||||||||||||||||||||||||||||||
|
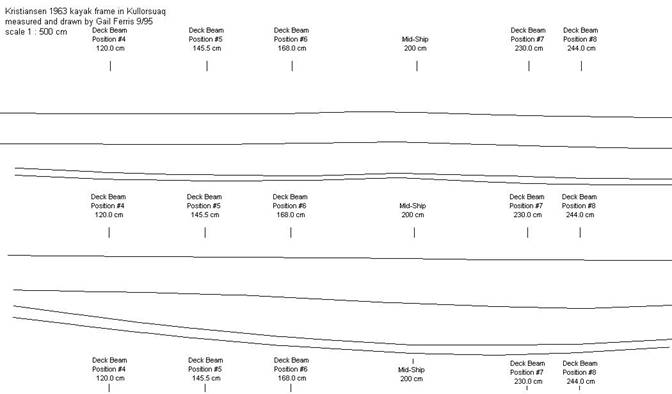
side deck beam starting from stern position
#4/5/6/midship/7/8 |
||||||||||||||||||||||||||||||||||||||||||||||||||||||||||||||||||||||||||||||||||||||||||||||||||||||||||||||||||||||||||||||||||||||||||||||||||||||||||||||||||||||||||||||||||||||||||||||||||||||||||||||||||||||||||||||||||||||||||||||||||||||||||||||||||||||||||||||||||||||||||||||||
|
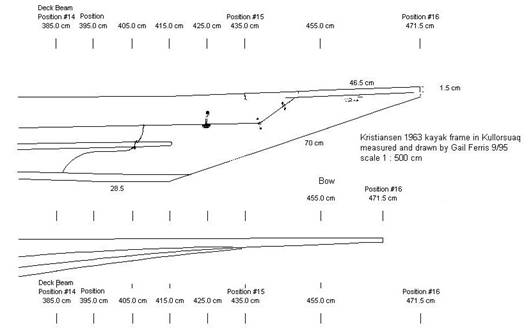
bow deck beam stern position #14/15/16 |
||||||||||||||||||||||||||||||||||||||||||||||||||||||||||||||||||||||||||||||||||||||||||||||||||||||||||||||||||||||||||||||||||||||||||||||||||||||||||||||||||||||||||||||||||||||||||||||||||||||||||||||||||||||||||||||||||||||||||||||||||||||||||||||||||||||||||||||||||||||||||||||||
|
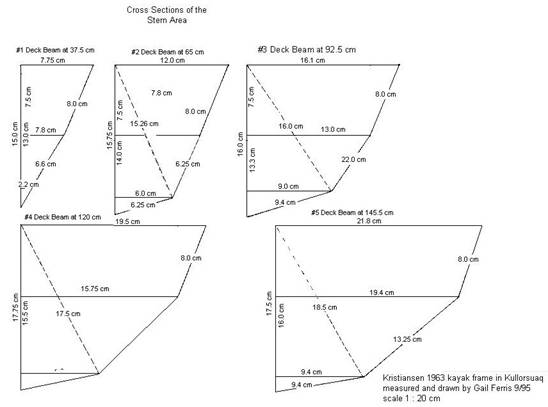
side xsections starting with stern #1 - 5 |
||||||||||||||||||||||||||||||||||||||||||||||||||||||||||||||||||||||||||||||||||||||||||||||||||||||||||||||||||||||||||||||||||||||||||||||||||||||||||||||||||||||||||||||||||||||||||||||||||||||||||||||||||||||||||||||||||||||||||||||||||||||||||||||||||||||||||||||||||||||||||||||||
|
vertical side chine measurements heading
toward bow positions 8 - 14 |
||||||||||||||||||||||||||||||||||||||||||||||||||||||||||||||||||||||||||||||||||||||||||||||||||||||||||||||||||||||||||||||||||||||||||||||||||||||||||||||||||||||||||||||||||||||||||||||||||||||||||||||||||||||||||||||||||||||||||||||||||||||||||||||||||||||||||||||||||||||||||||||||
|
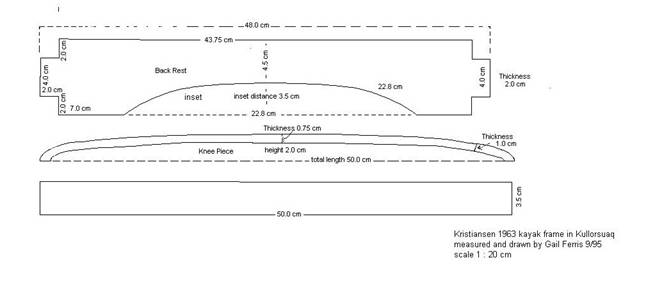
Bow side view parts drawn and dimensions |
||||||||||||||||||||||||||||||||||||||||||||||||||||||||||||||||||||||||||||||||||||||||||||||||||||||||||||||||||||||||||||||||||||||||||||||||||||||||||||||||||||||||||||||||||||||||||||||||||||||||||||||||||||||||||||||||||||||||||||||||||||||||||||||||||||||||||||||||||||||||||||||||
|
xsection views 7 & 8 |
||||||||||||||||||||||||||||||||||||||||||||||||||||||||||||||||||||||||||||||||||||||||||||||||||||||||||||||||||||||||||||||||||||||||||||||||||||||||||||||||||||||||||||||||||||||||||||||||||||||||||||||||||||||||||||||||||||||||||||||||||||||||||||||||||||||||||||||||||||||||||||||||
|
xsection views 9 & 10 |
||||||||||||||||||||||||||||||||||||||||||||||||||||||||||||||||||||||||||||||||||||||||||||||||||||||||||||||||||||||||||||||||||||||||||||||||||||||||||||||||||||||||||||||||||||||||||||||||||||||||||||||||||||||||||||||||||||||||||||||||||||||||||||||||||||||||||||||||||||||||||||||||
|
|
||||||||||||||||||||||||||||||||||||||||||||||||||||||||||||||||||||||||||||||||||||||||||||||||||||||||||||||||||||||||||||||||||||||||||||||||||||||||||||||||||||||||||||||||||||||||||||||||||||||||||||||||||||||||||||||||||||||||||||||||||||||||||||||||||||||||||||||||||||||||||||||||
|
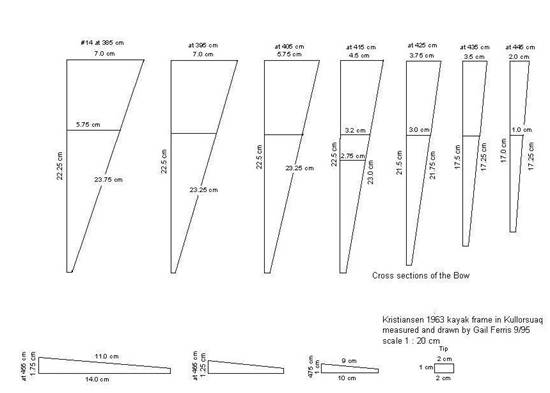
detailed bow xsections which do not reflect
what might have been a hollow bow as the Jensen kayaks have area 14 to the
bow tip |
||||||||||||||||||||||||||||||||||||||||||||||||||||||||||||||||||||||||||||||||||||||||||||||||||||||||||||||||||||||||||||||||||||||||||||||||||||||||||||||||||||||||||||||||||||||||||||||||||||||||||||||||||||||||||||||||||||||||||||||||||||||||||||||||||||||||||||||||||||||||||||||||
|
xsection of #6 and 200cm mid section |
||||||||||||||||||||||||||||||||||||||||||||||||||||||||||||||||||||||||||||||||||||||||||||||||||||||||||||||||||||||||||||||||||||||||||||||||||||||||||||||||||||||||||||||||||||||||||||||||||||||||||||||||||||||||||||||||||||||||||||||||||||||||||||||||||||||||||||||||||||||||||||||||
|
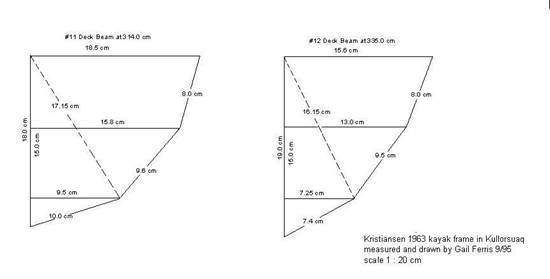
xsection of position #11 and 12 |
||||||||||||||||||||||||||||||||||||||||||||||||||||||||||||||||||||||||||||||||||||||||||||||||||||||||||||||||||||||||||||||||||||||||||||||||||||||||||||||||||||||||||||||||||||||||||||||||||||||||||||||||||||||||||||||||||||||||||||||||||||||||||||||||||||||||||||||||||||||||||||||||
|
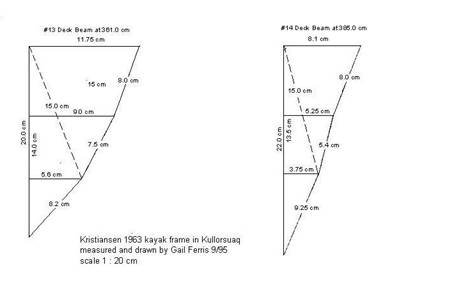
xsection of #13 and 14 |
||||||||||||||||||||||||||||||||||||||||||||||||||||||||||||||||||||||||||||||||||||||||||||||||||||||||||||||||||||||||||||||||||||||||||||||||||||||||||||||||||||||||||||||||||||||||||||||||||||||||||||||||||||||||||||||||||||||||||||||||||||||||||||||||||||||||||||||||||||||||||||||||
|
Actual
dimensions taken of Deck Beams from intersection on the Keel:
2nd group
Actually
the drawings should be consulted to see where the ribs leave off because the
2 cm bottom thickness is just the thickness of the ribs! of the
3rd group measured
on an angle from center to (2nd) chine
Top and
bottom of gunwale to show canting.
Bottom of gunwale forms the 1st chine.
Gunwales
8 cm high and 2 cm thick |